Posts

1993 Mazda Rx7 - Rotary Engine Rebuild - Final

Image
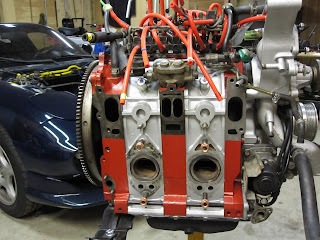
Intro - Part 1 - Part 2 - Part 3 - Part 4 - Parts List - Final As promised here are a few final photos of the engine bay as well as a couple videos of the car running. There is a short clip of the interior where you can see the aftermarket gauges/gauge pod as well. Engine start-up, interior layout, slight engine revving videos Hope you find the information on these posts useful. If you have any questions, feel free to contact me and I would be glad to assist. -TanthT
1993 Mazda Rx7 - Rotary Engine Rebuild - Parts List

Image
Intro - Part 1 - Part 2 - Part 3 - Part 4 - Parts List - Final Below I have listed practically every part I had ordered for the rebuild of my 13B engine as well as any additional parts that were upgraded/replaced as well. All of the "xxxx-xx-xxx" part numbers towards the top are Mazda specific part numbers which can of course be found at your local dealership or online if you take the time to look. Minus the extras listed at the bottom (transmission, radiator, vacuum line, motor mounts, oil pan brace, etc.), the engine rebuild alone cost around $2,000. Since I did the job myself and saved on labor costs, I was able to put that savings back into the car with reliability mods/upgrades as well as replace additional items like brittle coolant/air hoses, gaskets, oil injector lines, etc. These items are typically overlooked when doing just a core rebuild however I can be certain that if a part was bad or had potential for failure, then it was replaced. Qty Des...

1993 Mazda Rx7 - Rotary Engine Rebuild - Part 4

Image
Intro - Part 1 - Part 2 - Part 3 - Part 4 - Parts List - Final It has been a while since my last post due to a touch of procrastination...then the holidays ended up creeping in on us. In this posting I am going to go over some engine rebuild notes as well as some of the reliability mods I had installed in hopes to prevent the issue which prompted this rebuild in the first place. First off, a lot of the links I had provided in my previous rebuild postings are to websites/videos that really helped me so I suggest you check those out. Below I am also including additional links to specific videos/procedures which I had used during my rebuild. 1. Installing heavy duty water seals http://www.rebuildingrotaryengines.com/videos/heavy_duty_water_seals A lot of people use gasket sealant around the outside of the motor housing water jacket. I however, opted not to gum up the entire motor with sealant as it is completely unnecessary. If you take your time cleaning your housings and verifying...

1993 Mazda Rx7 - Rotary Engine Rebuild - Part 3

Image
Intro - Part 1 - Part 2 - Part 3 - Part 4 - Parts List - Final Welcome back. So now the short block is disassembled and I am taking time to clean all of the parts very carefully. A lot of people ask, "what should I use to clean these parts?" and I would have to say that kerosene works great for this job. Just make sure you have proper ventilation and a big exhaust fan is highly recommended if possible. You really only need about 2-3 gallons to clean all the motor parts. Next I will explain how I went about cleaning the engine parts and what tools were used. Rotor housings: On the 13-B motor, the rotor housings are the 2 aluminum sections where the rotors rotate (the combustion chambers). I was pretty lucky that my housings were in good shape after having 90k+ miles on them. I noticed a little carbon buildup around the spark plug holes which I cleaned off with a clean rag and kerosene. These housings should have a somewhat shiny surface on the inside and no grooves...

1993 Mazda Rx7 - Rotary Engine Rebuild - Part 2

Image
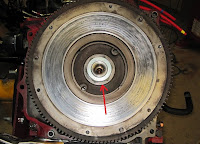
Intro - Part 1 - Part 2 - Part 3 - Part 4 - Parts List - Final I have stripped everything down to the short block and now needed to remove the large nut off of the back of the eccentric shaft. The socket needed is either a 2 1/8" or 54mm. If you need either of these I would suggest to ch eck your local Harbor Freight or go to HarborFreight.com. If you have trouble locating the socket online, give them a call to get pricing for a set that includes one of these sockets because I have seen them on the s helves and the whole set is cheaper than any single 2 1/8" socket I have found elsewhere. Next, you will need to secure the flywheel which will prevent the motor from turning so that you can remove the flywheel nut. You can either purchase a flywheel stopper/brake or simply grab a few feet of solid copper wire and wind it through a bolt hole and around one of the clutch alignment pins on the flywheel as I have shown in the photo to the left. This worked perfect for me,...

1993 Mazda Rx7 - Rotary Engine Rebuild - Part 1

Image
Intro - Part 1 - Part 2 - Part 3 - Part 4 - Parts List - Final At this point in the rebuild I had simply followed the service manual instructions to disconnect the transmission from the engine and drop it out from under the car. This was probably one of the easier tasks to accomplish but ended up being time consuming because I was waiting on an extra set of hands to actually assist in removing the transmission once it was disconnected. (Thanks Dad!) From here I just took my time to follow the service manual and disconnected all of the required hoses, lines and parts in sequence while laying them out in a pattern (left to right) on my makeshift table. Once I was at the point to where I could remove the motor, we used some very heavy straps and a 1 TON chain block to lift the motor up and out of the engine bay. The chain block was attached to a 5ft long 4" x 4" fence post that was positioned across 3 of the rafters directly above the car. Once the engine was high enoug...

1993 Mazda Rx7 - Rotary Engine Rebuild ... Intro

Image
Intro - Part 1 - Part 2 - Part 3 - Part 4 - Parts List - Final In late 2008, I had decided to drive my '93 Rx7 one last time before storing it away for the winter. Upon starting it up and backing it out of the garage I was greeted with the normal plume of white smoke coming from the exhaust due to condensation buildup in the exhaust from sitting for a few weeks. As I usually would let the car warm up for a few minutes before taking her out for a drive, I started walking toward the house. Just as soon as I had turned my back I had noticed the "to be expected" condensation burn off had turned into what some might call a smoke screen. I literally was unable to see the neighbors house through the foggy disappointment that was floating through the air in front of me. Now since winter was not too far away, I figured that I would let the car sit until Summer 09' before I attempted any work on the car. Little did I know, time was disappearing faster than I had planned....