1993 Mazda Rx7 - Rotary Engine Rebuild - Part 2
Intro - Part 1 - Part 2 - Part 3 - Part 4 - Parts List - Final
 I have stripped everything down to the short block and now needed to remove the large nut off of the back of the eccentric shaft. The socket needed is either a 2 1/8" or 54mm. If you need either of these I would suggest to check your local Harbor Freight or go to HarborFreight.com. If you have trouble locating the socket online, give them a call to get pricing for a set that includes one of these sockets because I have seen them on the shelves and the whole set is cheaper than any single 2 1/8" socket I have found elsewhere.
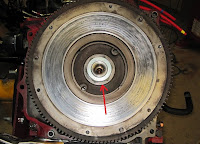
Next, you will need to secure the flywheel which will prevent the motor from turning so that you can remove the flywheel nut. You can either purchase a flywheel stopper/brake or simply grab a few feet of solid copper wire and wind it through a bolt hole and around one of the clutch alignment pins on the flywheel as I have shown in the photo to the left. This worked perfect for me, and it was cheap! Once you have removed the flywheel nut, you may be wondering how to get the flywheel off of the tapered eccentric shaft. This is actually much simpler than one might think.
1) Make sure you leave the flywheel nut threaded onto the eccentric shaft a few threads. (Trust me on this one) This will ensure the flywheel does not fall off and hit the ground, or smash your foot when it falls off.
2) I used the technique found at this link "flywheel removal instructions" with a brass hammer. The flywheel literally just fell off with 3 solid hits in the designated area.
If you were planning on removing the pilot bearing and pilot bearing seal to prep for replacement, now is the perfect time for this. I have found many places charging $99 - $160 for "Mazda factory" pilot bearing removal tools or the like. Save your d@mn money for something else as I have found a PERFECT tool that is not only identical, but performs the exact same task at less than a 3rd of the cost. Once again, HarborFreight.com has a "Blind Hole Bearing Puller" for about $33 bucks that does an absolute fantastic job with this. Another plus is you will not have to feel bad about having to spend $100+ for a tool that you literally may only use less than a handful of times in your lifetime. You can thank me later.
After the flywheel is off and the pilot bearing w/ seal has been removed, you are now ready to continue following your dis-assembly instructions to gradually remove the 18 tensions bolts as described in the workshop manual. During this stage I suggest finding a sturdy platform or table to place the short block on so that you can disassemble the motor while keeping all the short block parts organized. Below is a photo I had taken after I cleaned the parts and painted the motor but it gives you the general idea of how you might want to lay out the motor when disassembling.
My next post will deal mainly with rebuild concerns, cleaning procedures, and recommendations. I will also touch on how I found the cause of my blown motor.
Stay tuned....
 I have stripped everything down to the short block and now needed to remove the large nut off of the back of the eccentric shaft. The socket needed is either a 2 1/8" or 54mm. If you need either of these I would suggest to check your local Harbor Freight or go to HarborFreight.com. If you have trouble locating the socket online, give them a call to get pricing for a set that includes one of these sockets because I have seen them on the shelves and the whole set is cheaper than any single 2 1/8" socket I have found elsewhere.
Next, you will need to secure the flywheel which will prevent the motor from turning so that you can remove the flywheel nut.
 You can either purchase a flywheel stopper/brake or simply grab a few feet of solid copper wire and wind it through a bolt hole and around one of the clutch alignment pins on the flywheel as I have shown in the photo to the left. This worked perfect for me, and it was cheap! Once you have removed the flywheel nut, you may be wondering how to get the flywheel off of the tapered eccentric shaft. This is actually much simpler than one might think.
1) Make sure you leave the flywheel nut threaded onto the eccentric shaft a few threads. (Trust me on this one) This will ensure the flywheel does not fall off and hit the ground, or smash your foot when it falls off.
2) I used the technique found at this link "flywheel removal instructions" with a brass hammer. The flywheel literally just fell off with 3 solid hits in the designated area.
If you were planning on removing the pilot bearing and pilot bearing seal to prep for replacement, now is the perfect time for this. I have found many places charging $99 - $160 for "Mazda factory" pilot bearing removal tools or the like. Save your d@mn money for something else as I have found a PERFECT tool that is not only identical, but performs the exact same task at less than a 3rd of the cost.
 Once again, HarborFreight.com has a "Blind Hole Bearing Puller" for about $33 bucks that does an absolute fantastic job with this. Another plus is you will not have to feel bad about having to spend $100+ for a tool that you literally may only use less than a handful of times in your lifetime. You can thank me later.
After the flywheel is off and the pilot bearing w/ seal has been removed, you are now ready to continue following your dis-assembly instructions to gradually remove the 18 tensions bolts as described in the workshop manual. During this stage I suggest finding a sturdy platform or table to place the short block on so that you can disassemble the motor while keeping all the short block parts organized. Below is a photo I had taken after I cleaned the parts and painted the motor but it gives you the general idea of how you might want to lay out the motor when disassembling.

My next post will deal mainly with rebuild concerns, cleaning procedures, and recommendations. I will also touch on how I found the cause of my blown motor.
Stay tuned....


Comments
Post a Comment