1993 Mazda Rx7 - Rotary Engine Rebuild - Part 3
Intro - Part 1 - Part 2 - Part 3 - Part 4 - Parts List - Final
Welcome back. So now the short block is disassembled and I am taking time to clean all of the parts very carefully. A lot of people ask, "what should I use to clean these parts?" and I would have to say that kerosene works great for this job. Just make sure you have proper ventilation and a big exhaust fan is highly recommended if possible. You really only need about 2-3 gallons to clean all the motor parts. Next I will explain how I went about cleaning the engine parts and what tools were used.
Rotor housings:
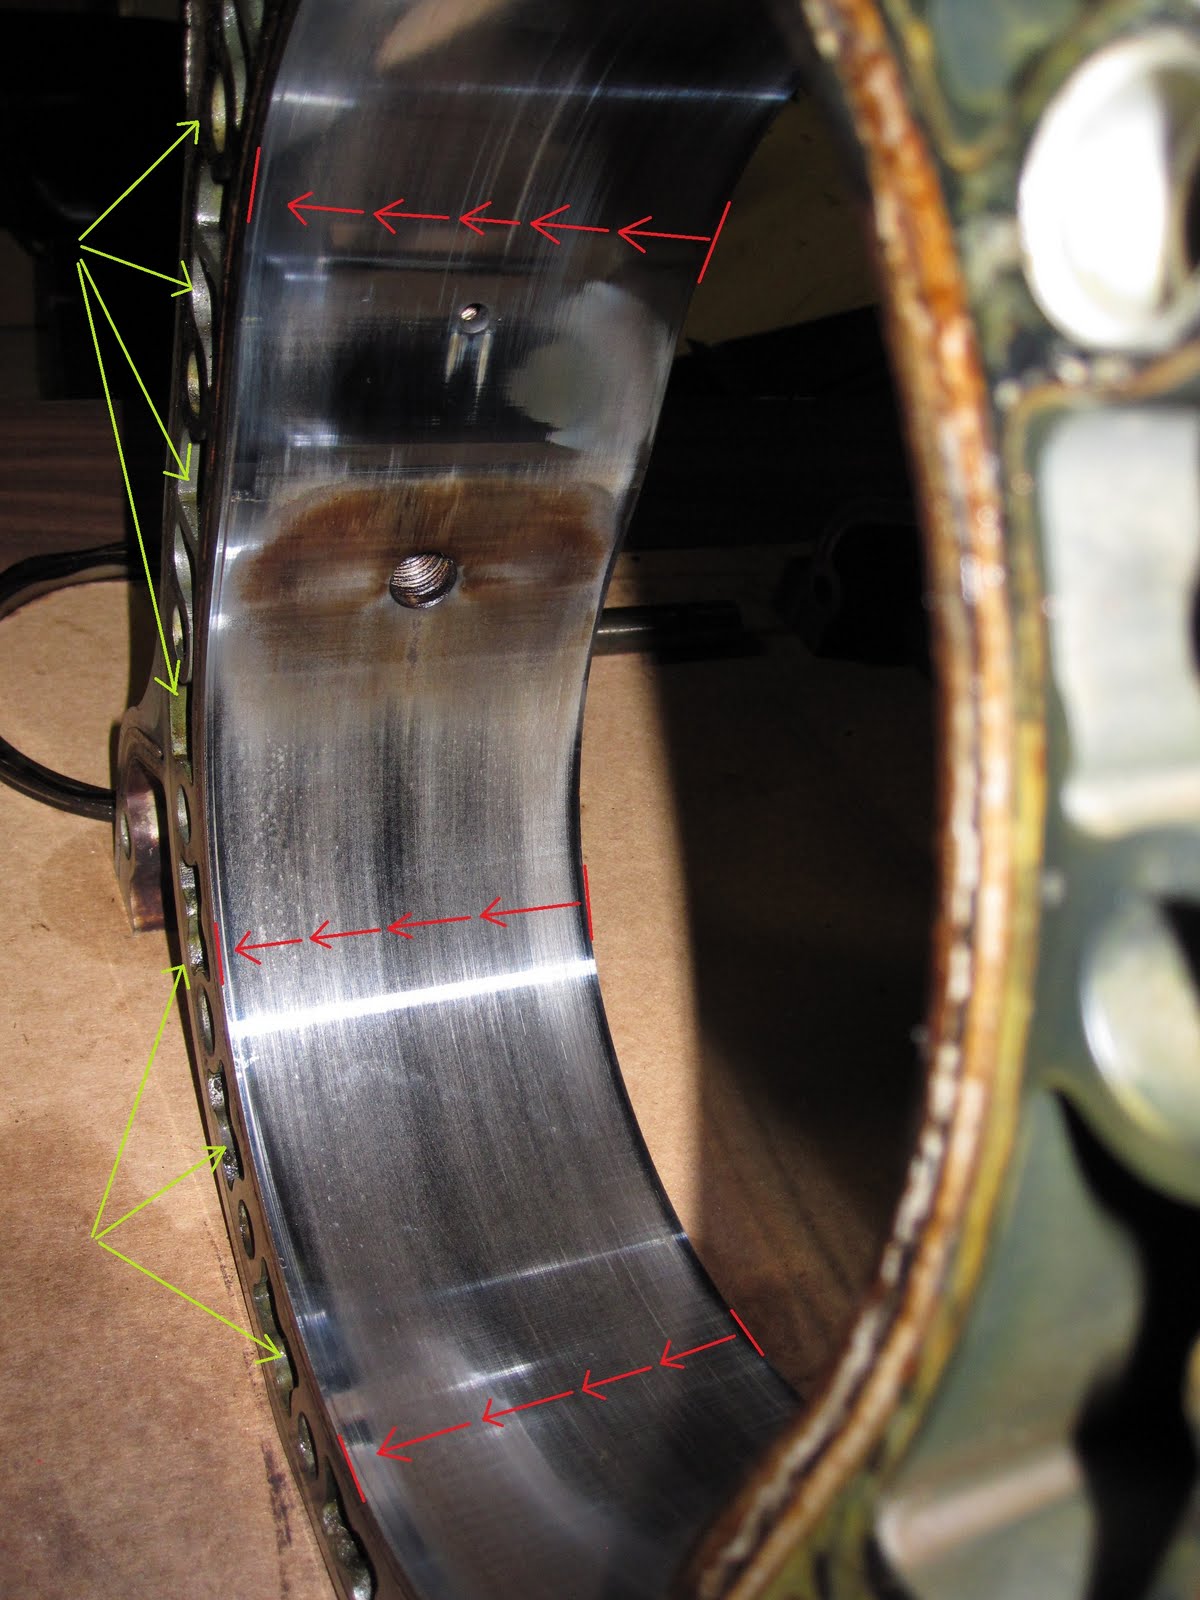
On the 13-B motor, the rotor housings are the 2 aluminum sections where the rotors rotate (the combustion chambers). I was pretty lucky that my housings were in good shape after having 90k+ miles on them. I noticed a little carbon buildup around the spark plug holes which I cleaned off with a clean rag and kerosene. These housings should have a somewhat shiny surface on the inside and no grooves. For a simple check, just run your finger across the width of the housing (red) in various locations to make sure there are no wear grooves which might compromise the integrity of the motor or apex seals. Afterward I cleaned the sides where the water seals sit with a brass wire brush and kerosene. Be careful to not scratch the inside rotor housing during the cleaning process.
Once the housing sides are clean, you can then check your service manual on how to see if they are within the required specifications.
After I had cleaned my housings and verified they were within spec, I took things a step farther and used a Dremel tool with a brass brush wire attachment to clean out all of the water passages (green) around the outside of the housing. Then afterward blew out the water jacket passageways with compressed air to remove any debris left behind.
Rotors:
My rotor side seals and apex seals were rusted in place since the motor was left sitting with coolant in the front housing for over a year. Because of this accompanied by the fact that the motor had over 90k miles on it, I had already planned on replacing all of the seals/springs on the rotors from the beginning.
At first I was not sure if the rotors were going to be salvageable because of the surface rust so I soaked each side in kerosene to help try and loosen things up. I then used a small flat screwdriver to pry the side seals/springs and apex seals/springs out of the rotor being extremely careful not to damage the rotor. Once I removed the seals/springs I then used my brass wire brush again with the kerosene to scrub all the rotor surfaces down. Once the sides were clean I used one of the old side seals to thoroughly clean all the seal grooves on each side of the rotor. A lot of carbon builds up in these areas so now is the best time to clean out as much as possible. This is a very time consuming process however the more carbon you remove now, the better chance your rotary engine will have at lasting a long time.

Here is a photo of one of my rotors all cleaned up. On the sides with the "bathtub" shaped indentations in them (red), I cleaned those with a 6" wire wheel on my bench grinder. The wire wheel made cleaning these sides a very easy task so I would highly recommend this method to anyone! One thing you must be careful of is to not use the wire wheel on the area next to the side seal grooves, (green) this area is a softer material which you do NOT want to damage.
I would like to make note of one thing I noticed when cleaning my rotors. The rotor bearing appeared to be worn somewhat however there were no grooves or scratches in it (which is a good s ign). What stood out though was in a few places it looked as though the top layer of the bearing was worn through. Because of the bearing wear combined with research I found online, I decided to replace the rotor bearings as well as the main bearings on the engine. I knew in the long run, the few extra bucks would give me piece of mind that this engine would be solid once the job was complete. Here is a picture of the wear marks on the bearing where you can see the copper starting to show through.
Iron housings:
The iron housings are the 3 heavy iron sections which separate and seal the rotor housings. To clean a majority of the housings I used the same kerosene and rags with a brass wire brush. One area which n eeds a lot of special attention are the water seal grooves (green). These grooves are what separate your motors combustion chambers from the coolant water jacket. If you get a bad seal anywhere in this area, then get used to looking at all those engine parts laying around because you will be looking at them again much sooner than if you take your time and do it right.
Now my water seals were all cracked, broken and seemingly baked into their respective grooves. For this job, I just grabbed a small flat-head screwdriver that was a little narrower than the width of the water seal groove itself. This made scraping out of all the carbon and old seal debris much easier. Again though, take your time as this seal is very critical. Go over it 1000 times if you have to just to make sure you get all of the carbon and debris out of the seal groove. It was during this phase of my cleaning process that I finally realized why my motor filled with coolant in the first place.
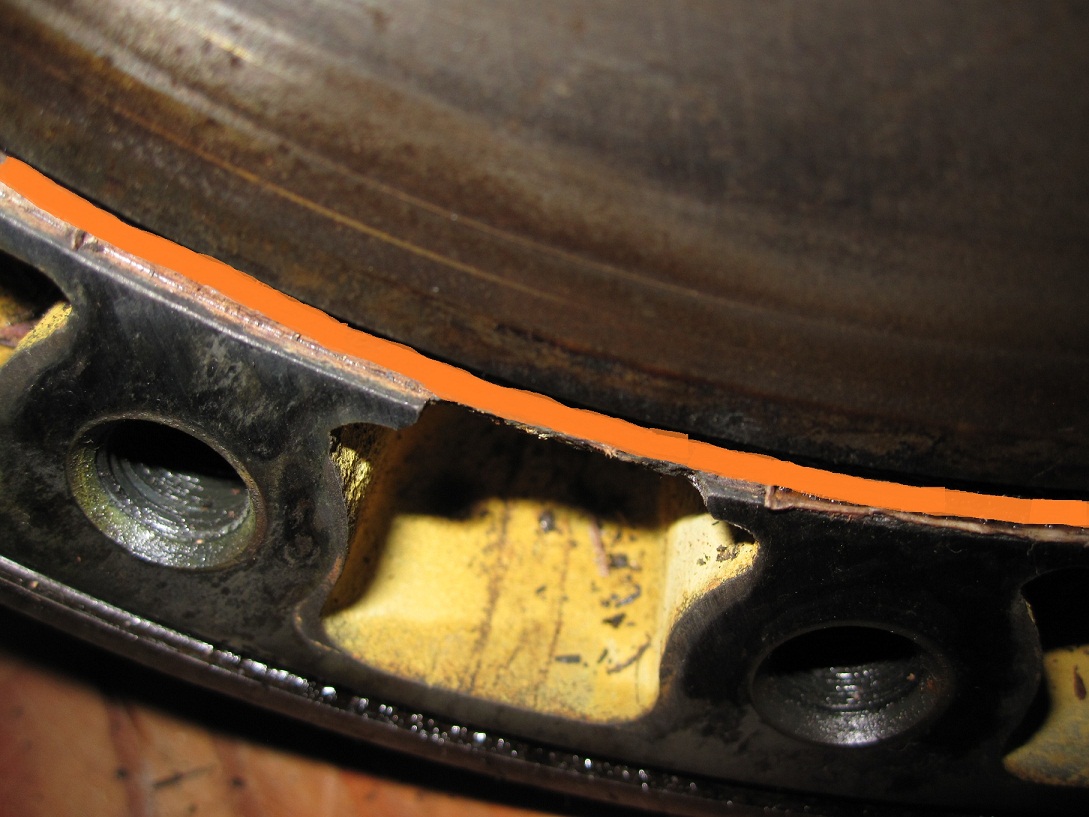
The culprit: The front iron housing.
Below you can see that on the bottom of the front housing, right next to the water seal groove (orange), a section of the metal is missing. The piece that was in place had simply fell out while I was cleaning it. From what I later researched online, this area is actually prone to failure when the engine reaches "overheating" type temps. It was at "that point," it felt as if someone turned the light switch on. The coolant boiling over, the intermittent puffs of white smoke, and lastly the coolant literally dumping out from the exhaust port by the turbochargers. Everything started making much more sense. The further I got into the rebuild, the more I learned about the history of this car.
Here are a few more helpful links as well as the link from where I had purchased my replacement heavy duty water seals.
HD water seals:
http://www.pineappleracing.com/hdwatersealsfdrews5re.aspx
Tons of parts (practically everything):
http://mazdatrix.com/
More parts:
http://www.atkinsrotary.com/
In the next post, I will try to focus mainly on the actual rebuild as well as talk about a few reliability upgrades I had implemented.
Welcome back. So now the short block is disassembled and I am taking time to clean all of the parts very carefully. A lot of people ask, "what should I use to clean these parts?" and I would have to say that kerosene works great for this job. Just make sure you have proper ventilation and a big exhaust fan is highly recommended if possible. You really only need about 2-3 gallons to clean all the motor parts. Next I will explain how I went about cleaning the engine parts and what tools were used.
Rotor housings:
On the 13-B motor, the rotor housings are the 2 aluminum sections where the rotors rotate (the combustion chambers). I was pretty lucky that my housings were in good shape after having 90k+ miles on them. I noticed a little carbon buildup around the spark plug holes which I cleaned off with a clean rag and kerosene. These housings should have a somewhat shiny surface on the inside
 and no grooves. For a simple check, just run your finger across the width of the housing (red) in various locations to make sure there are no wear grooves which might compromise the integrity of the motor or apex seals. Afterward I cleaned the sides where the water seals sit with a brass wire brush and kerosene. Be careful to not scratch the inside rotor housing during the cleaning process.
Once the housing sides are clean, you can then check your service manual on how to see if they are within the required specifications.
After I had cleaned my housings and verified they were within spec, I took things a step farther and used a Dremel tool with a brass brush wire attachment to clean out all of the water passages (green) around the outside of the housing. Then afterward blew out the water jacket passageways with compressed air to remove any debris left behind.
Rotors:
My rotor side seals and apex seals were rusted in place since the motor was left sitting with coolant in the front housing for over a year. Because of this accompanied by the fact that the motor had over 90k miles on it, I had already planned on replacing all of the seals/springs on the rotors from the beginning.
At first I was not sure if the rotors were going to be salvageable because of the surface rust so I soaked each side in kerosene to help try and loosen things up. I then used a small flat screwdriver to pry the side seals/springs and apex seals/springs out of the rotor being extremely careful not to damage the rotor. Once I removed the seals/springs I then used my brass wire brush again with the kerosene to scrub all the rotor surfaces down. Once the sides were clean I used one of the old side seals to thoroughly clean all the seal grooves on each side of the rotor. A lot of carbon builds up in these areas so now is the best time to clean out as much as possible. This is a very time consuming process however the more carbon you remove now, the better chance your rotary engine will have at lasting a long time.

Here is a photo of one of my rotors all cleaned up. On the sides with the "bathtub" shaped indentations in them (red), I cleaned those with a 6" wire wheel on my bench grinder. The wire wheel made cleaning these sides a very easy task so I would highly recommend this method to anyone! One thing you must be careful of is to not use the wire wheel on the area next to the side seal grooves, (green) this area is a softer material which you do NOT want to damage.
I would like to make note of one thing I noticed when cleaning my rotors. The rotor bearing appeared to be worn somewhat however there were no grooves or scratches in it (which is a good s
 ign). What stood out though was in a few places it looked as though the top layer of the bearing was worn through. Because of the bearing wear combined with research I found online, I decided to replace the rotor bearings as well as the main bearings on the engine. I knew in the long run, the few extra bucks would give me piece of mind that this engine would be solid once the job was complete. Here is a picture of the wear marks on the bearing where you can see the copper starting to show through.
Iron housings:
The iron housings are the 3 heavy iron sections which separate and seal the rotor housings. To clean a majority of the housings I used the same kerosene and rags with a brass wire brush. One area which n
 eeds a lot of special attention are the water seal grooves (green). These grooves are what separate your motors combustion chambers from the coolant water jacket. If you get a bad seal anywhere in this area, then get used to looking at all those engine parts laying around because you will be looking at them again much sooner than if you take your time and do it right.
Now my water seals were all cracked, broken and seemingly baked into their respective grooves. For this job, I just grabbed a small flat-head screwdriver that was a little narrower than the width of the water seal groove itself. This made scraping out of all the carbon and old seal debris much easier. Again though, take your time as this seal is very critical. Go over it 1000 times if you have to just to make sure you get all of the carbon and debris out of the seal groove. It was during this phase of my cleaning process that I finally realized why my motor filled with coolant in the first place.
The culprit: The front iron housing.
Below you can see that on the bottom of the front housing, right next to the water seal groove (orange), a section of the metal is missing. The piece that was in place had simply fell out while I was cleaning it. From what I later researched online,
 this area is actually prone to failure when the engine reaches "overheating" type temps. It was at "that point," it felt as if someone turned the light switch on. The coolant boiling over, the intermittent puffs of white smoke, and lastly the coolant literally dumping out from the exhaust port by the turbochargers. Everything started making much more sense. The further I got into the rebuild, the more I learned about the history of this car.
Here are a few more helpful links as well as the link from where I had purchased my replacement heavy duty water seals.
HD water seals:
http://www.pineappleracing.com/hdwatersealsfdrews5re.aspx
Tons of parts (practically everything):
http://mazdatrix.com/
More parts:
http://www.atkinsrotary.com/
In the next post, I will try to focus mainly on the actual rebuild as well as talk about a few reliability upgrades I had implemented.


Comments
Post a Comment