How To Remove Dust "Blobs" from Optoma HD70, HD72, EzPro 745 DLP
Just recently I have been experiencing what a lot of projector owners refer to as, "Dust Blobs". Upon researching this annoyance, I had found that there were a lot of projector owners out there who were trying to locate answers as to how to clean these suckers out of their own home projectors.
For those who do not know what a "dust blob" is, it is when a spec of dust lands inside the imaging mechanism (lens and/or mirrors, etc.) of a projector. Some may think, "big deal, its a tiny spec of dust". Well, given the nature of projectors, this pin sized spec of dust gets magnified a billion times then is conveniently projected right out onto your movie screen resulting in most cases as a blurry hexagonal shaped "light " spot on the screen. This spot is typically just a shade lighter than the overall displayed image on the screen and is most noticeable when the video/image being displayed from the projector is black. The size or quantity can vary, obviously, however in my case the dust blob was approx. 5-6inches wide.
At first I tried to look past "the blob" and enjoy the movies however because I knew it was there, my eyes were always drawn to it which would tend to ruin my movie watching experience. This is when I decided to hit up Google for some info but to no avail, it had looked as if nobody had come up with a way to fix the problem. One guy was lucky enough to have this exact issue within his warranty period, so he sent the projector in to Optoma.............then never updated his blog with a status. This is where I come in. I refuse to let a particle of dust, drive me or anyone else to insanity. So I held my breath, ripped apart my HD70 projector, FOUND THE PROBLEM!!! and worked up the below instructions in hopes that it will help you guys as well.
My Google search returned quite a few results of people trying to resolve this issue on this exact model projector, so I hope this helps them out!
Tools:
- Medium sized Philips screw driver
- Small flat head screw driver
- Flashlight
- Cotton swab (Q-tip)
Step 1) If the projector was in use, make sure it has been set to cool down for at least 30 minutes to prevent damage to the bulb during dis-assembly. (per the warning label)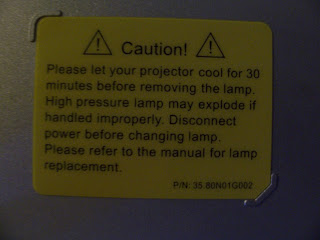 Step 2) Turn the projector upside down and remove the 2 Philips screws for the bulb cover.
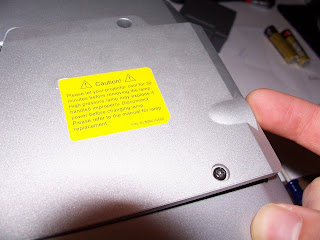

 Step 3) Lift up the bulb access cover and gently "wiggle" it outwards and set aside for now.
Step 4) Unscrew/loosen the 2 Philips screws that are holding the bulb casing in place.
 Step 5) Flip the metal bulb casing handle upwards and gently pull straight up while "wiggling" the casing slightly back and forth, then carefully set the casing aside where it will not get bumped/dropped.
 Step 6) Remove the 3 Philips screws that are holding the plastic front casing of the projector together.
Step 7) Flip the projector upwards so that the lens is facing the ceiling and so that you are looking at the underside of the projector.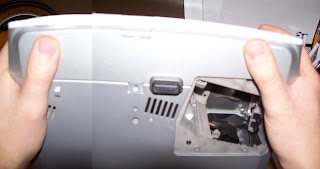 Step 8) Using your thumbs, put upward pressure on the casing as to push the casing away from you. You may have to wiggle it a little however, once the the side closest to you pops loose you can then slowly lift the front casing upwards and away from the main body of the projector.
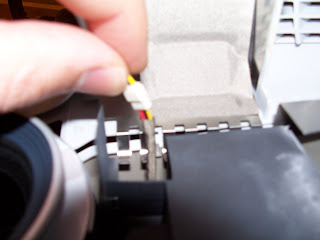
 Step 9) Once the front casing is free, you must disconnect the wires to the IR sensor by separating the wire clips, then set the front casing aside.
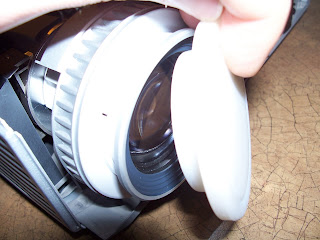
 Step 10) If you have a lens cover, (as seen in the photo below) place it over the projector lens to prevent any damage to it.
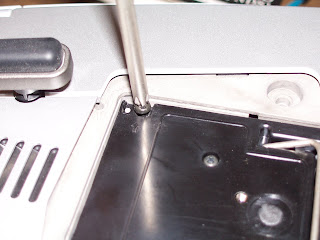
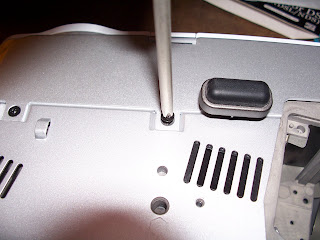
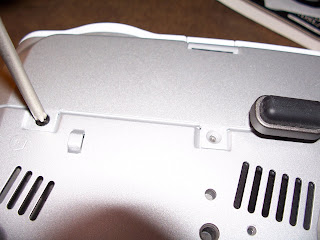
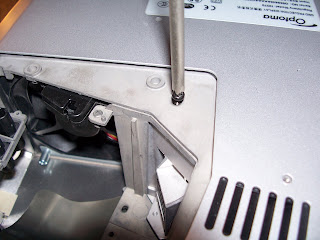
 Step 11) Remove the top 2 Philips screws (circled in red) on the back of the projector.
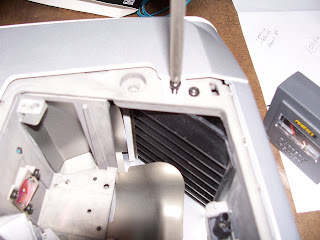
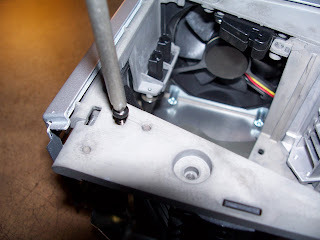
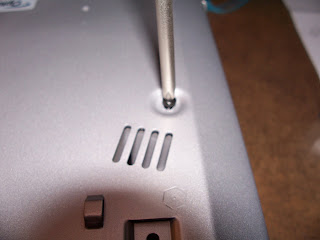
 Step 12) Flip the projector over and remove the following 3 screws which hold the top casing of the projector in place. (2 by the bulb housing and 1 on the opposite side of the projector)
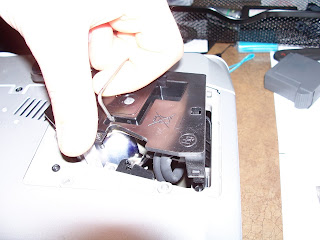
Step 13) Place the projector upright and you should now be able to wiggle the top cover of the projector loose. Note: On my HD70 there was sticky tape on the back left side, (see below in red) which I had to separate from the top cover to get it loose.
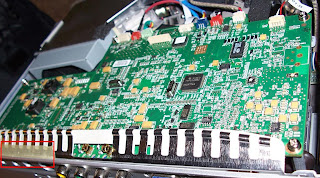 Step 14) After you pull the top cover off you will notice a ribbon cable that connects the projector buttons to the main circuit board. Pay attention to the direction in which the ribbon cable is plugged in and then proceed to carefully pull the cable out from the main board then set the cover aside.
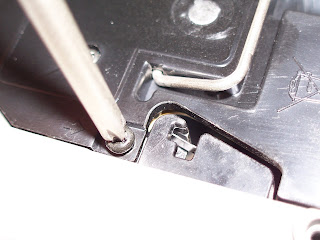
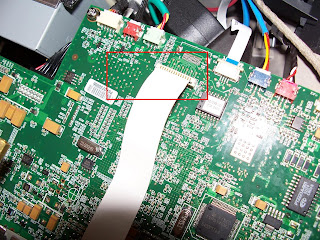 Step 15) Now turn the projector sideways so that the main projector lens is closest to you and look for the wire clip below and lens access panel. Once you have found the wires and access panel, remove the wire from the main board so that you have a clear view of the lens access panel.
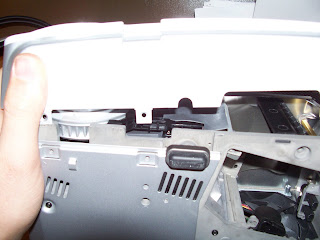
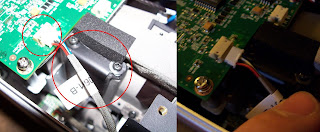 Step 16) Remove the 2 Philips screws holding the black lens access panel in place. (Removing the black foam piece is optional)
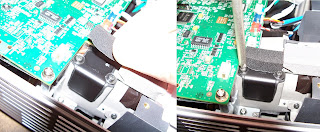 Step 17) IMPORTANT: Make sure the projector is in a dust free area! Then, using your small Flathead screwdriver, carefully pry up the corner of the access panel to loosen it.
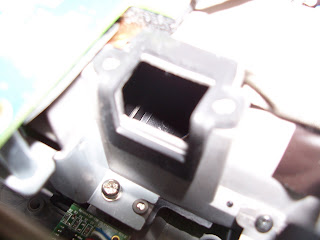
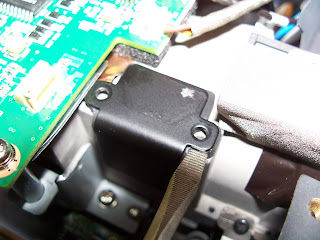 Step 18) Remove the access panel to expose the inside of the main projector lens assembly and set it aside.
 Step 19) I do not have photos of this next process however as long as you are careful, it was quite easy:
a)The main projector display lens is located inside and to the left. (see red arrow) b) Remove the rubber main lens cap that we installed in "Step 10)" then turn on your flashlight and shine it directly into the main lens from the front side of the projector.
c) By carefully looking into the access panel, (photo above) you should now be able to see the reflected light from your flashlight in the the display lens. I created a diagram below so you can understand the point of view.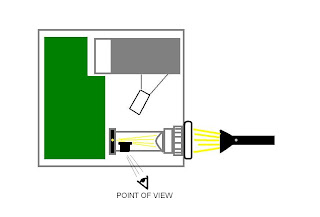
Step 20) By moving the flashlight up and down and from left to right you should be able to easily spot the dust (tiny bright specs) on the display lens inside the access panel. Note: Be careful not to breathe or accidentally blow air into the main lens assembly.
Step 21) Next, take a clean dry cotton swab (Q-tip) and through the access panel that you are looking through, very gently brush the dust off of the display lens by applying very MINIMAL pressure. Continue this procedure carefully until you no longer are able to see the dust specs on the lens.
Step 22) Once you no longer see dust on the display lens, proceed to cover up the lens access panel and carefully reassemble your projector in the reverse order that we have taken it apart.
Step 23) Your done!! Plug in your projector and try it out!
I had excellent results when cleaning the display lens using these steps and I no longer have "dust blobs" on my screen!
I hope that my time spent putting these instructions together helps you guys out there that have been looking for answers (like me) and could not find them.
-TanthT
For those who do not know what a "dust blob" is, it is when a spec of dust lands inside the imaging mechanism (lens and/or mirrors, etc.) of a projector. Some may think, "big deal, its a tiny spec of dust". Well, given the nature of projectors, this pin sized spec of dust gets magnified a billion times then is conveniently projected right out onto your movie screen resulting in most cases as a blurry hexagonal shaped "light " spot on the screen. This spot is typically just a shade lighter than the overall displayed image on the screen and is most noticeable when the video/image being displayed from the projector is black. The size or quantity can vary, obviously, however in my case the dust blob was approx. 5-6inches wide.
At first I tried to look past "the blob" and enjoy the movies however because I knew it was there, my eyes were always drawn to it which would tend to ruin my movie watching experience. This is when I decided to hit up Google for some info but to no avail, it had looked as if nobody had come up with a way to fix the problem. One guy was lucky enough to have this exact issue within his warranty period, so he sent the projector in to Optoma.............then never updated his blog with a status. This is where I come in. I refuse to let a particle of dust, drive me or anyone else to insanity. So I held my breath, ripped apart my HD70 projector, FOUND THE PROBLEM!!! and worked up the below instructions in hopes that it will help you guys as well.
My Google search returned quite a few results of people trying to resolve this issue on this exact model projector, so I hope this helps them out!
Tools:
- Medium sized Philips screw driver
- Small flat head screw driver
- Flashlight
- Cotton swab (Q-tip)
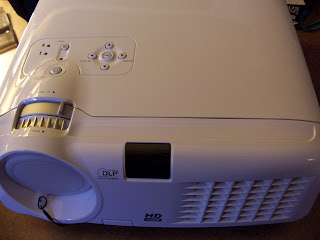
Optoma HD70

Step 1) If the projector was in use, make sure it has been set to cool down for at least 30 minutes to prevent damage to the bulb during dis-assembly. (per the warning label)
 Step 2) Turn the projector upside down and remove the 2 Philips screws for the bulb cover.
 Step 3) Lift up the bulb access cover and gently "wiggle" it outwards and set aside for now.
Step 4) Unscrew/loosen the 2 Philips screws that are holding the bulb casing in place.

 Step 5) Flip the metal bulb casing handle upwards and gently pull straight up while "wiggling" the casing slightly back and forth, then carefully set the casing aside where it will not get bumped/dropped.
 Step 6) Remove the 3 Philips screws that are holding the plastic front casing of the projector together.


Step 7) Flip the projector upwards so that the lens is facing the ceiling and so that you are looking at the underside of the projector.
 Step 8) Using your thumbs, put upward pressure on the casing as to push the casing away from you. You may have to wiggle it a little however, once the the side closest to you pops loose you can then slowly lift the front casing upwards and away from the main body of the projector.
 Step 9) Once the front casing is free, you must disconnect the wires to the IR sensor by separating the wire clips, then set the front casing aside.
 Step 10) If you have a lens cover, (as seen in the photo below) place it over the projector lens to prevent any damage to it.
 Step 11) Remove the top 2 Philips screws (circled in red) on the back of the projector.
 Step 12) Flip the projector over and remove the following 3 screws which hold the top casing of the projector in place. (2 by the bulb housing and 1 on the opposite side of the projector)


Step 13) Place the projector upright and you should now be able to wiggle the top cover of the projector loose. Note: On my HD70 there was sticky tape on the back left side, (see below in red) which I had to separate from the top cover to get it loose.
 Step 14) After you pull the top cover off you will notice a ribbon cable that connects the projector buttons to the main circuit board. Pay attention to the direction in which the ribbon cable is plugged in and then proceed to carefully pull the cable out from the main board then set the cover aside.
 Step 15) Now turn the projector sideways so that the main projector lens is closest to you and look for the wire clip below and lens access panel. Once you have found the wires and access panel, remove the wire from the main board so that you have a clear view of the lens access panel.
 Step 16) Remove the 2 Philips screws holding the black lens access panel in place. (Removing the black foam piece is optional)
 Step 17) IMPORTANT: Make sure the projector is in a dust free area! Then, using your small Flathead screwdriver, carefully pry up the corner of the access panel to loosen it.
 Step 18) Remove the access panel to expose the inside of the main projector lens assembly and set it aside.
 Step 19) I do not have photos of this next process however as long as you are careful, it was quite easy:
a)The main projector display lens is located inside and to the left. (see red arrow)
 b) Remove the rubber main lens cap that we installed in "Step 10)" then turn on your flashlight and shine it directly into the main lens from the front side of the projector.
c) By carefully looking into the access panel, (photo above) you should now be able to see the reflected light from your flashlight in the the display lens. I created a diagram below so you can understand the point of view.

Step 20) By moving the flashlight up and down and from left to right you should be able to easily spot the dust (tiny bright specs) on the display lens inside the access panel. Note: Be careful not to breathe or accidentally blow air into the main lens assembly.
Step 21) Next, take a clean dry cotton swab (Q-tip) and through the access panel that you are looking through, very gently brush the dust off of the display lens by applying very MINIMAL pressure. Continue this procedure carefully until you no longer are able to see the dust specs on the lens.
Step 22) Once you no longer see dust on the display lens, proceed to cover up the lens access panel and carefully reassemble your projector in the reverse order that we have taken it apart.
Step 23) Your done!! Plug in your projector and try it out!
I had excellent results when cleaning the display lens using these steps and I no longer have "dust blobs" on my screen!
I hope that my time spent putting these instructions together helps you guys out there that have been looking for answers (like me) and could not find them.
-TanthT

Thank you so much for this guide. It must have been published a little while after I discovered dust blobs on my own HD70. Back then, all suggestions to solve this problem I could find on the internet would involve a professional servicing shop. Thanks to your guide I am very happy to watch movies again - now they are picture perfect.
ReplyDeleteAny idea how similar this is to the HD73? I have dust blobs in mine and this seems to be the only description on how to clear them on an Optoma projector...
ReplyDeleteMany thanks for the guide.
-brian3165
ReplyDeleteI am uncertain how similar these 2 models are however, DLP projectors are comprised of the same components. If you are familiar with computers/electronics and have patience, I am very confident that you could locate the dust and clean it out. The HD70 is the first projector I myself have ever attempted to take apart. You just need to take your time and keep organized. Take photos if you need to, then you can create a tutorial :) Good luck and let me know if you decide to give it a shot!
-TanthT
Hello TanthT,
ReplyDeleteI need your brain.
Short of that, I need your help.
My HD70 is going woof, overheating - and Optoma was bold enough to say it's cheaper to buy a new one.
So, if you could - I noticed the Google Talk tanthonyt - I am also on there: jamjammorelli@gmail.com
Thanks in advance
Hi do you know anything about a green flashing that comes on about 40 min using? There is only about 700 hr on the bulb I don't know what to do
ReplyDeleteI did read something about the mirror but I am not sure if that is it or not.
Thank you for the great pics and time you took to show how to take it apart!
patmerz@gmail.com
Thanks!!
-spud
ReplyDeleteDoes the projector shutdown after the green flashing light turns on? If so, my guess is that the cooling fan(s) in the projector may no longer be working properly and the unit is overheating. Do not use the projector until you have time to investigate the problem further or you might do more damage to the projector. Also, I have investigated a few reported issues where dust may have been building up on one of the circuit board components which may be causing them to overheat. My best suggestion would be to carefully check the fan(s) to verify that they are working. If they look good, then carefully take the unit apart to see if you have this dust problem and carefully clean out the unit as best you can then check your results. Keep me posted on your progress!!
Good Luck,
-TanthT
-spud
ReplyDeleteMy apologies, I misunderstood the issue. What type of environment is the projector kept in? Is it dust/smoke free and is the unit out of warranty?
You may want to try another cable for starters. Also, if you are using HDMI, try using Component (Red,Green,Blue) instead to see if the problem continues.
Lastly, the color wheel is a rotating disc located inside the projector behind the lamp (bulb) which provides the color that is displayed on the screen. Since the color is flashing from red to green, there may be a possibility that the unit is very dirty/dusty causing the wheel to get out of sync. Check this video - http://www.youtube.com/watch?v=Uz3z129CDzk - Is this the same issue you are seeing? If so, you may want to open the unit up and check for any dust buildup around the color wheel if it is out of warranty. If you still have problems after new cables and a thorough cleaning....the projector main board may be failing and need to be replaced.
Let me know how it goes and Good luck!
-TanthT
Just had a single dust speck ruin my evening with an HD72. I tried to find a way in myself and missed the door somehow. Other than the case opening procedure these instructions are pretty spot on for the 72. The door position and access is almost identicle. Thanks!!!!! (of course I was looking at that new 1080P.... ;) )
ReplyDeleteHi TanthT,
ReplyDeleteTo answer your questions it is out of warranty, I messed with the hdmi cable and hooked up the other and then went back to the original hdmi
and so far everything is working great again so I don't know what it
was but it's working great now!
Thank you for all your help
-spud
I have optoma hd70.
ReplyDeleteI have an inputs problem s-video, video and component does't work. Rgb is working good.Thank you. Arthur
-Arthur
ReplyDeletePlease send the specifics of your setup to me at tanthonyt@gmail.com as well as anything you may have tried to resolve the issue.
Hello, thank you for your step by step guide, it made it very easy. However, I just set up my projector again after putting it back together and now the picture is very blurry, I tried adjusting the zoom and it didn't help. I have it on the same setting it was before. Could I have damaged the lens? Any idea what I could have done to cause this?
ReplyDeleteThank You, Rich.
Please disregard my last post. I took it apart again and dinked around in there. I'm not sure why, but when I put it together it worked like a charm. Anyway, thank you for taking the time to post this blog, the step by step instructions made it a breeze. I also checked out your lost camera site, what a great idea! Keep up the good work.
ReplyDeleteGreat news Richard! I am glad it worked out for you.
ReplyDeleteYou are the man! I am going to name my next child after you. I've tried three different times to get rid of theses spots and no luck until I read your post. Awesome job! By the way, my projector is a EP745 and the process was identical.
ReplyDeleteThanks for this guide, using it tomorrow for some serious dismantling. I'm just over 2000 hours and it's been blinking green the last 500 hours. For those 500 hours I've found that using a floor fan solves the issue.
ReplyDeleteAlltho now it's time to find a more feasible solution, possibly replacing or adding another fan.
BTW does anyone know the voltages of the fans? Standard 12v as in puters?
hi Guys ! Thanks a lot for the guide ! I'm using an HD72 ans was able to get to the final step... I see my damn unique dust spot, but can't take it away with the cotton swab. When I put the swab in front of it, I see the light spot disappear on the right lens. I can't remove the dust spot on the left lens, it's like it's on the other side of the lens, is that possible ?
ReplyDeleteThe dust spot appeared after an Optoma service, they are saying I need to replace the "light engine". Does that mean I need to have the light engine replaced completely to get rid of it ? Any clues ? Thanks for your help !
That was great.... your instructions passed the Matrix test. The first 15 minutes of that film were remarkably annoying with dust blobs.
ReplyDeleteThanks
Thanks a lot! Optima should make user manuals like this... This infomation should be made to anyone that wants to fix thier own machine! I was wondering if it would be feasable to just make our own filters to put in front of the Air intake... Seems to me like it would be a no brainer to have added a dust filter or some sort of air filter to the machine to begin with. Design flaw maybe.
ReplyDeleteAgain, Thank you for the time it took you to make this. It's great.
Thanks for posting this guide! I was pleasantly surprised how straight forward this ended up being! All the dust blobs are now gone! you rock man!
ReplyDeleteWow!!! Thank you so, so much for posting this tutorial!!! I've had my Optoma EzPro 745 DLP projector for about 3-4 years now and I love playing video games and watching movies on it. I'm very anal about picture quality. When I notice a weird shape on my projector screen, I freaked out. It looked like a cobweb got stuck inside my lens somehow. I used a can of air blow it out, which took care of the cobweb, but now I had crazy dust blobs showing up all over the screen. I found your tutorial, and followed instructions step-by-step (shaking with nervousness the home time). I used a q-tip and shot some air into that tiny space (while holding the can upright to make sure no fluid got in there). I could see what a huge difference that made while using a flashlight as you instructed. I put it all back together, and now a have perfect picture once again!!!! I'm so friggin' happy again!!! LOL. Thanks so much!!!!
ReplyDelete-Joshua
ReplyDeleteThank you for the positive feedback. I am glad this tutorial worked out for your model projector.
-TanthT
Great Blog...
ReplyDeleteI have an Optima HD 70 DLP Projector. I followed all of your instructions and cleaned my filthy color wheel! My only problem is after I put everything back together and turn the projector on you can hear the fans and everything go on but then after a few try's the orange bulb light comes on and I never get a picture. I did move the color wheel not sure if that screwed everything up or not. Any ideas?
Thanks
Wow, Thanks for the write up. These instructions worked for the HD72, no problem. NO MORE BLOBS!!! I cant believe I spent a year watching with dust blobs when I could have cleaned them off myself in like 10 minutes!!
ReplyDeleteCan't thank you enough for documenting this!!
-Tim
ReplyDeleteThat specifically sounds like an issue with the bulb itself. The bulb probably is not lighting up which is why you are not getting any picture. Maybe try to re-seat the bulb assembly, otherwise, there maybe a possibility that the bulb was damaged during the cleaning of the projector. Let me know if you figure it out.
-TanthT
I tried this a month ago but got stuck when removing the large ribbon cable. How does that come off exactly? Seemed like I was about to damage it..
ReplyDeleteAlso, I just have an overheating problem no blobs. Any advice on what to clean?
Great guide btw!
-SVV
ReplyDeleteThe ribbon cable is thin so pull up by grabbing each side of the cable (and as close to the connector as you can get) with your thumbs and index fingers and gently wiggle the cable back and forth. It should come right out. Also, as far as the overheating. Look for any dust build up on the main board and in the corners and clean it out as best you can. Good luck!
-TanthT
Ah, okay. I didn't realize the ribbon cable itself came out of the connector. I thought the whole connector came out. So that worked, and I took it apart and cleaned it thoroughly with alcohol swabs and some compressed air. I lifted the main circuit board as well and cleaned everything I could find including what appears to be the color wheel. It was caked with dust. I also re-cleaned the lens which your article talks about. Put everything back together, and the system ran great for about five minutes before freaking out with psychedelic colors again. Now, in theory I could take the thing down more to get at some of the other components but I'm starting to think this may be another issue. Do you have any suggestions about what could be causing my overheating problems? If I put a fan at the rear of the projector it seems to mitigate the color flashing. I am also running the projector in high-altitude mode, which basically means the fan stays on at all times. This is an Optoma HD70 by the way.
ReplyDelete-SVV
ReplyDeleteIf the projector had an overall overheating issue due to high temperatures, then it would power itself off and the LED next to the thermometer icon would start flashing. If the "psychedelic colors" are the only issue you seem to be having, then you may want to try the following:
1. Try another video input other than the one you are currently using to see if the flashing continues. (if currently using hdmi, then try component, svideo, etc.)
2. It is also very possible that the color wheel is becoming out of sync which could be due to dust buildup and/or excess heat. Clean the entire system out as thoroughly and carefully as possible. Especially around the color wheel components. I have heard of many reports of this issue you have described and most of the time it is dust/dirt related.
Good luck and let me know how it goes.
-TanthT
Fantastic! Just followed this procedure for an HD72, worked flawlessly. Well done.
ReplyDeleteThanks you for taking the time to do this guide. I believe I have a colour (UK spelling!) wheel dust issue and this will help in opening up my HD70.
ReplyDeleteThank you so much :)
I don't have dust blobs, but I suspect that there is a lot of dust build up inside the projector, causing it to overheat. Do I need to follow all of the steps above just to clean out any accumulated dust? I found some other instructions at this link:
ReplyDeletehttp://www.fixya.com/support/t636722-hd_70_dlp_projector_problem
Look at Solution #3 by Doug Stanko.
In your experience, are Doug's instructions right?
-Brian
ReplyDeleteThese instructions are to fix a specific problem however they of course can easily be followed if you want to just open up the projector to simply clean it out.
Good Luck!
-TanthT
TanthT,
ReplyDeleteGreat Post! Fixed my problem. I also had the problem appear after sending it to a "repair" place for a couple of new fans. Thanks for your help!
tanthT,
ReplyDeleteI cant thank you enough for this tutorial. My problem wasn't dust blobs but overheating. Thanks to you i was able to dismantle the unit and blow out the dust. I found that if you also remove the rear panel (2 more screws and 2 small nuts on the vga connection) it gives you much better access to blow air through it. I was amazed at how much dust accumulates. This solved my overheating problems. I'm not sure a can of air would work so I used an air compressor with a moisture filter on and set it for 25 psi. Thanks again
THANK YOU SO much for putting together this guide. It has been a lifesaver!
ReplyDelete-Vic
This is a great guide. I've been looking for something like this for months. My HD70 was working fine when all of a sudden it started to just shut down by itself and the orange lamp light would stay solid. I'd unplug it and restart it but after a while it started doing it every 5 minutes so I replaced the lamp. Now when I power it on it never comes on and the orange light comes on immediately. Plus, I don't hear the whirring noise like I used to when I power it up, like it's dead even though the lights work. I'm going to take it apart and poke around but thought maybe you had an idea. Thanks again! gdm
ReplyDeleteWell, when I removed it from the ceiling mount I heard a bunch of stuff rattling around. When I opened it up a bunch of little pieces that look like mirrors fell out. Is this the color wheel that's broken? And if so I'm assuming it's not worth it to have it replaced probably, huh? It figures this happens during the Football season. Thanks for any advice or help you can give. gdm
ReplyDelete-jacketfan66
ReplyDeleteYou said the pieces look like mirrors? Are they different colors, if so, then yes that is the color wheel. If the projector was having issues before the color wheel fell apart then I am not too sure it would be worth the time, effort and money to attempt to fix it. Might be a good time to reinvest in newer unit that uses a more reliable technology. Just remember to read your reviews online before you buy. 10 minutes of "Googling" can save you a bunch money and a ton of headache.
Good luck!
-TanthT
you saved me from purchasing new projector!!
ReplyDeleteout of a sudden, the projector started displaying wrong colors.
I completely disassembled it (even the mainboard) using your instructions, and reassembled it and it works again perfectly! I have no idea what was loose but it is now fixed!
Thank you very much
I recently moved. I took down my ceiling mounted HD70 at my old place, and 6 weeks later re-mounted it at my new place. two light spots appeared right in the middle of the screen where there were none before.
ReplyDeleteI've now learned these spots are called dust blobs.
My heart sank, thinking I was going to have to pay a fortune to get this repaired, or buy a new projector, but a few minutes on google found me this site, and your guide explained what it is and how to fix it perfectly !
I did run into a small problem on re-assembly, that is, the safety cutout switch that the lamp assembly door is kind of finicky, which prevented the whole projector from powering up, initially making me thing I'd damaged it. but it was a minor thing, and easily fixed.
THANKYOU SO MUCH !! I have a perfect projector picture again.
Used directions on Optoma EzPro 739. Worked great only 2 real differences. Firstly the IR port is soldered to its wires so instead of pulling the connection apart, as in Step 9, a piece of black tape and a light shield had to be pulled back to expose 2 screws which easily freed the entire port from the front face. Secondly the ribbon in step 14 is locked into place by a hinged snap lock. Carefully lifting the dark grey frame up and way from the motherboard released the ribbon.
ReplyDeleteThe only other suggestion I might make is to lose the q-tip. It left so many tiny pieces of cotton in the compartment, that I abandon the idea, and instead used canned air and "lint-free" swabs called Chamber Clean.
Thanks Again!
I had taken my projector apart once before to replace the driver board. I was a little concerned about unsealing the optics but after cleaning everything else I still had the "blobs". I removed the optics cover and use the Q-tip and the blobs are gone!!! In between the Q-tip brushing I used a vacuum to suck out any dislodged dust so it would not settle back onto the lens. Great tutuorial! Thanks!
ReplyDeleteFlicking problem on Optoma HD200x
ReplyDeletei have just bought a New Optoma HD200x on line ( Internet) . The second time i used it, after 10 minutes ,the image from my Optoma HD200x will start to flicker wildly and change colour to a green or blue hue, making it totally unwatchable. The unit is situated in a totally open area, so should not be overheating, and it's only 3 days old so shouldn't be failing at this point. Please help me. as i live in Mauritius and i bought in france. we do not have any repair center for optoma in Mauritius. It a New Apparatus. Anyone had similar problems? Please i need help.
Awesome guide - did everything (reading all step by step, carefully) - my color wheel now works like a charm and no more temperature warnings :) Just make sure to read thoroughly
ReplyDeleteHad the same problem. Reached the same solution. Yay!
DeleteFor the HD73, the white top separates from the gray bottom after you a) take out the lamp and b) remove 5 screws from the outside edges of the bottom of the projector. Then the same steps apply to disconnecting the IR, Temp, and controls harnesses, and then opening the access panel.
ReplyDeleteThanks again for this!!!
Ok I don't know if mine were dust blobs as such. Even projected onto a 110" screen they were only small spec's of a cm or so - I think because the projector hadn't been used for a few weeks. I cleaned the front lens with no effect and then watched TV for an hour. By the end the spots were gone. Either they got burnt off by the lamp, or blown through by the fan. So if you see dust on first switch on - just tolerate it for a while before ripping your projector apart - it may clear itself!
ReplyDeleteThanks for the detailed guide. My HD80 was similar enough to get my dust blobs cleaned out the same way. :)
ReplyDeleteI did the same for my HD80, although I didn't had the dust blobs the "lamp" led turned red and beamer shut down after a few minutes. Because it was so dirty inside a simple clean didn't help anymore so I had to take it completely apart. I made pictures of it and I can make like a tutorial for it if theres any interest for it.
ReplyDeleteAfter cleaning everything the best way possible I put everything together and now it looks like I broke it... No image at all and it still turns off. Now the image looks like this https://lh6.googleusercontent.com/-Lf4y_Izxb40/UA1e2XyVPJI/AAAAAAAAAjA/Dw7UAoPtMzE/s729/12+-+1.
Maybe it was my own fault after all, because I hoped I could clean something, so I tried to remove a screw which was like locked. That's this screw https://lh5.googleusercontent.com/-NW0lJosuURw/UA1kEfomodI/AAAAAAAAAjQ/OoDKp_zhWKc/s815/photo.jpg
Probably that was locked for a reason.
I was hoping I could fix it by cleaning it myself and then sell it. So I kinda regret I did it my self. Although, this could also happen in the service center and then they will just tell you that the part what broke was broken already, so its not like they will repair it free then ;)
Thank you!!! My DLP projector developed the same white blob issue with the black screen after only having a total of 600 hours. I have a DELL 4210X DLP. Luckily I didn't need to remove the motherboard to access the optical assembly. Im not sure what projector Dell put thier name on but my optical assembly was identical to the Optima you posted. I found the reason why mine developed the issue so soon; DELL didn't design this unit with an intake filter. All tThe lcd projectors I had in the past did. While I had it apart I dusted it out and made a dust filter where the air gets pulled in from the cooling fan.
ReplyDeleteAwesome! Man..thank you SO much for all this! I have a Mitsu HC3800 which just yesterday developed what I believe is a dust blob only visible on white screens or very light colors. I was googling like crazy without any luck till I stumbled on your blog :) Different company but same technology, I guess now I feel a little more confident I can solve it by myself :)
ReplyDeleteNice article::
ReplyDeleteI Have an Optoma EP721 and it started with little white spots and the spots grew more over time. I did as was instructed twice but noticed that the DMM chip was the culprit. See photo attached: http://i1049.photobucket.com/albums/s386/mcnealious/optoma_EP721/0069e1fe-6f25-4dc3-a1de-ab897724187e_zps9a27a642.jpg
Changing the DMD (digital Micro-mirror Device) will solve issue if the problem isn't dust.
Great! Thanks so much! My HD70's color wheel and/or fan needed cleaning. You saved me a bundle!
ReplyDelete