Posts

Showing posts from 2010

1993 Mazda Rx7 - Rotary Engine Rebuild - Part 3

Image
Intro - Part 1 - Part 2 - Part 3 - Part 4 - Parts List - Final Welcome back. So now the short block is disassembled and I am taking time to clean all of the parts very carefully. A lot of people ask, "what should I use to clean these parts?" and I would have to say that kerosene works great for this job. Just make sure you have proper ventilation and a big exhaust fan is highly recommended if possible. You really only need about 2-3 gallons to clean all the motor parts. Next I will explain how I went about cleaning the engine parts and what tools were used. Rotor housings: On the 13-B motor, the rotor housings are the 2 aluminum sections where the rotors rotate (the combustion chambers). I was pretty lucky that my housings were in good shape after having 90k+ miles on them. I noticed a little carbon buildup around the spark plug holes which I cleaned off with a clean rag and kerosene. These housings should have a somewhat shiny surface on the inside and no grooves

1993 Mazda Rx7 - Rotary Engine Rebuild - Part 2

Image
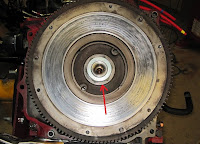
Intro - Part 1 - Part 2 - Part 3 - Part 4 - Parts List - Final I have stripped everything down to the short block and now needed to remove the large nut off of the back of the eccentric shaft. The socket needed is either a 2 1/8" or 54mm. If you need either of these I would suggest to ch eck your local Harbor Freight or go to HarborFreight.com. If you have trouble locating the socket online, give them a call to get pricing for a set that includes one of these sockets because I have seen them on the s helves and the whole set is cheaper than any single 2 1/8" socket I have found elsewhere. Next, you will need to secure the flywheel which will prevent the motor from turning so that you can remove the flywheel nut. You can either purchase a flywheel stopper/brake or simply grab a few feet of solid copper wire and wind it through a bolt hole and around one of the clutch alignment pins on the flywheel as I have shown in the photo to the left. This worked perfect for me,

1993 Mazda Rx7 - Rotary Engine Rebuild - Part 1

Image
Intro - Part 1 - Part 2 - Part 3 - Part 4 - Parts List - Final At this point in the rebuild I had simply followed the service manual instructions to disconnect the transmission from the engine and drop it out from under the car. This was probably one of the easier tasks to accomplish but ended up being time consuming because I was waiting on an extra set of hands to actually assist in removing the transmission once it was disconnected. (Thanks Dad!) From here I just took my time to follow the service manual and disconnected all of the required hoses, lines and parts in sequence while laying them out in a pattern (left to right) on my makeshift table. Once I was at the point to where I could remove the motor, we used some very heavy straps and a 1 TON chain block to lift the motor up and out of the engine bay. The chain block was attached to a 5ft long 4" x 4" fence post that was positioned across 3 of the rafters directly above the car. Once the engine was high enoug

1993 Mazda Rx7 - Rotary Engine Rebuild ... Intro

Image
Intro - Part 1 - Part 2 - Part 3 - Part 4 - Parts List - Final In late 2008, I had decided to drive my '93 Rx7 one last time before storing it away for the winter. Upon starting it up and backing it out of the garage I was greeted with the normal plume of white smoke coming from the exhaust due to condensation buildup in the exhaust from sitting for a few weeks. As I usually would let the car warm up for a few minutes before taking her out for a drive, I started walking toward the house. Just as soon as I had turned my back I had noticed the "to be expected" condensation burn off had turned into what some might call a smoke screen. I literally was unable to see the neighbors house through the foggy disappointment that was floating through the air in front of me. Now since winter was not too far away, I figured that I would let the car sit until Summer 09' before I attempted any work on the car. Little did I know, time was disappearing faster than I had planned.

Samsung Intrepid (SPH-i350) Hard Reset Instructions

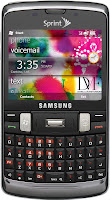
Below are the steps to completely wipe out your Samsung Intrepid (SPH-i350) and reset the phone to its factory defaults. Note: This process WILL delete all your contacts and any files you have saved to the phones internal memory. So complete a FULL sync of your phones data or make sure to backup everything manually. 1) Push and hold the power button until the 'Shutdown' box appears 2) Touch 'OK' to power down the handset 3) Press and hold the 'Enter/Settings' key (silver rectangular button in the middle of the directional pad) and the power button to restart the handset. (Do NOT let go of either key until the format screen appears) 4) Touch the green Talk key to begin formatting the handset (Again, this will delete all data and restore the factory default settings) That is all! -TanthT

Fix Inverted Controls: Batman Arkham Asylum (PC Version)

For anyone who has attempted to play Batman: Arkham Asylum on their PC with a gamepad: You may have ran into an problem where the character walks forward while you press down on the left analog stick and walks backward when you press up on the analog stick. Also, if you are used to the normal XBOX/XBOX360 controller layout, you may notice the X/Y and A/B control bindings are backwards as well. This issue can be quite annoying as most all attempts to correct this through any software outside of the game itself seem to be disregarded. NOTE: These instructions are for specific use with an original XBOX S controller with the USB mod!! If you would like this to work with another gamepad, you need to figure out what binding your PC is using to reference that specific controller first. Below I have posted instructions on how this issue can be easily fixed. 1) Browse to the "\BmGame\Config\" directory where the game is installed. For example: "C:\Program Files (x86)\Ei

Wii Energizer 2x Induction Charger - Flashing Red Light - **Update**

Image
After I had posted this troubleshooting walk-through, I had decided to just leave my Wii Remotes on the charger any time they are not in use. The reason for this was because the manual states that this system will NOT continue to try and charge the batteries once they are at 100%. (Makes sense of course) Since I have started using it like this, I have had zero problems. I am wondering if these batteries are subject to the well known "rechargeable battery memory problem" that we all know and love. (For those who are unfamiliar, Google it!) At the same time, I am now wondering if the original cause of the issue is because sometimes only 1 of the batteries in the pack are charging. If so, it would make sense that the induction charger would not attempt to charge it any further because the battery pack is reporting that it is charged. For anyone continuing to have problems with this system and who would like to do some troubleshooting on their own. I would like to challenge

Sprint's Samsung Intrepid: How To Tether - Use as Modem

Image
Just recently I swapped out my Moto Q9c for the Samsung Intrepid. Now this is not a review of either phone but I must say that the Intrepid is a very nice upgrade from the Q9c. It has all of the functionality of the Q9c plus a LOT more. Now, when I first was researching this phone I had come across multiple comments online about how you are unable to tether this phone to your PC. Since I highly value this option I was hesitant to make the swap, but I figured I would give the Intrepid a run anyways. Once I started up the Intrepid I went directly into the menus as usual to see what was available. Low and behold, the familiar "Internet Sharing" icon was present. From here, I tethered the phone to my laptop without an issue. For those of you having issues, below I have included a walk through of the exact process. Step 1) Press your Windows key to bring up the menu. Step 2a) Scroll down to the "Internet Sharing" icon and select it. Step 2b) You will now be presented

Wii Energizer 2x Induction Charger - Flashing Red Light

Image
Scenario: Approximately 2 months ago I had purchased the Energizer 2x Induction Charger (flat panel) for my Wii console. I loved the fact that you could simply just rest any Wii remote (that has included induction battery installed) directly on to this flat panel device and the charging begins. Whether you have the motion plus attachment and/or the rubber protective Wii remote cover installed, you simply lay the controller down as indicated by the product image on the box and voila. Simple enough right? (Insert Disappointment Here) Well, yesterday I placed one of my Wii remotes onto the induction panel only to find that in about 5-10 minutes time, a flashing red light caught my attention. Now anyone that works with ANY electronics at all can deduce that "red flashing light"...is NEVER a good thing. Especially those Xbox 360 fans out there. Now keep in mind, I have only charged this particular Wii remote maybe 4 times MAX since I bought this charging system. (I d